The retail till
Everything a cashier does at the counter: scan, search, fix a quantity, take money off, park a ticket for the customer who forgot their wallet, and take the payment. Written for someone standing at the till, not reading about it.
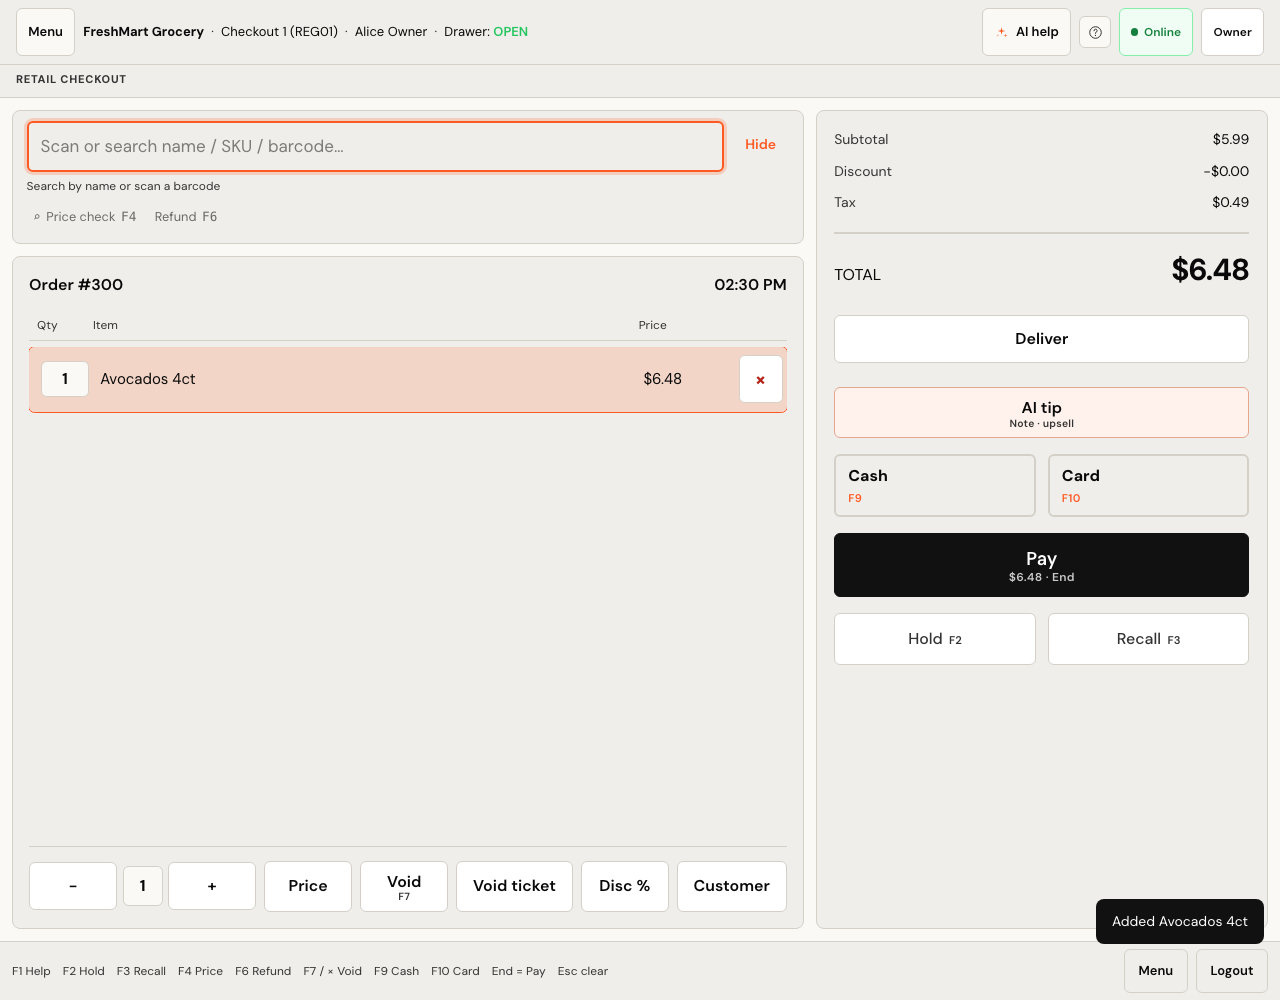
What is on the screen
| Part | What it is for |
|---|---|
| Top bar | Store, register, who is signed in, and Drawer: OPEN
or CLOSED. Also the clock, an Online /
Offline pill, and your role. |
| Search box | Where scans land. Placeholder reads Scan or search name / SKU / barcode…. Hide collapses it when you only ever scan; Show search brings it back. |
| Ticket | The lines on this sale, with the order number and the time in the store's own timezone. Each row has qty, item, price and a × to void just that row. A sale only gets its Order # when it is paid — see Receipts. |
| Line actions | Under the ticket: −, the quantity, +, Price, Void, Void ticket, Disc %, Customer. |
| Often bought with | A strip under the ticket after a scan, holding up to two products as buttons — tap one to add it. It appears only when the scanned item has pairings; see What sells together. |
| Money side | Subtotal, Discount, Tax, TOTAL, then Cash, Card, Pay, Hold and Recall. Where the store has those modules on, Gift card and Use points sit alongside Cash and Card, and Pay later appears where deferred payment is allowed. |
| Key strip | The bottom line printing every shortcut the till binds, plus Menu and Logout. |
Scanning an item
A barcode scanner is a keyboard. It types the number into whatever has the cursor and then presses Enter for you. That means typing the number by hand and pressing Enter is a scan — same lookup, same result. Use it when a label is torn or the scanner is sulking.
- Make sure the cursor is in the search box. It puts itself back there after every add, so normally you do nothing.
- Scan the item, or type its barcode and press Enter.
- The line appears at the bottom of the ticket, flashes, and a small Added … message confirms it.
Anything that looks like a barcode — 8 to 64 letters, digits or dashes — always goes to the barcode lookup, never to whatever row happened to be highlighted in the suggestion list. And Enter is never Pay. A scanner firing Enter at the wrong moment must not be able to take money.
The barcode is not in the catalog
The line still appears, marked Unknown with the number you scanned and a Skip button. Nothing is added to the total. Either find the item by name instead, or tap Skip and set the product up properly later.
Finding an item by name
- Type part of the name or the SKU. Suggestions appear after a moment.
- Move the highlight with ↑ and ↓.
- Press Enter or tap the row to add it.
Each suggestion shows the SKU and barcode, the price, and the stock on hand. An item with none left is badged Out of stock and cannot be picked — unless the store has been set to allow selling out of stock, in which case it is only badged, not blocked.
Changing a quantity
Three ways, all doing the same thing:
- Tap the line, then use − and + under the ticket. + and − on the keyboard do the same.
- Or tap the quantity number itself — on the line or in the actions row — to open the on-screen keypad.
- Type the number and tap Apply.
The keypad dialog is headed Edit line and names the item under it. It has digits, C to clear and ⌫ to backspace, a −/+ pair, and three buttons: Remove, Cancel, Apply. Applying a quantity of zero removes the line — which is the sensible thing for a keypad to do rather than refusing and leaving you stuck.
Changing a price
The Price button only appears for people whose role carries price override. If it is there, tap it (or tap the line's price) and the same keypad opens on a Price tab. Price edits are per line and per sale — they never change the product.
Taking money off a line
- Tap the ticket line you want to discount.
- Tap Disc %.
- Tap a preset — 5%, 10%, 15%, 20% — or type a percent and tap Apply.
Discounts here are per line, not per ticket, and must be between 0 and 100%. The discounted row shows how much came off. If no line is selected the till says Tap a ticket line first, then Disc % rather than guessing which item you meant.
Removing lines
| To do this | Press | What happens |
|---|---|---|
| Remove one row | The × on that row | That line only, straight away. |
| Remove the selected line | Void or F7 | Voids the highlighted line. With nothing selected it voids the last one. |
| Clear the whole ticket | Void ticket, twice | The button changes to Confirm clear. Tap it again within a few seconds to go through with it. |
The second tap exists because clearing a full basket by accident, at a queue, is not a mistake anyone recovers from gracefully.
Parking a ticket and getting it back
A customer goes back for the milk they forgot. Park the ticket, serve the next person, pick it up again.
- Press F2 or tap Hold. The panel is titled Park sale (draft).
- Type a note — it is required. A name, a table, a reason: whatever will let you spot it in the list later.
- Tap Park draft. The till clears, ready for the next customer.
- To get it back, press F3 or tap Recall and pick it from the list. Each entry shows its order number, your note and the total.
Attaching a customer
Tap Customer, search, and pick them. The ticket header then reads Customer · their name. You need at least one item on the ticket first — the till will say Add an item first, then attach a customer. Tap Customer again to change or clear it.
Price check without adding anything
Press F4 or tap Price check. Scan or search in the panel and it shows the price, SKU, barcode, tax class and — if your role can see stock — what is on hand and where. Nothing goes on the ticket unless you tap Add to sale. That is the whole point: a customer asking "how much is this?" should not end up buying it.
Taking the payment
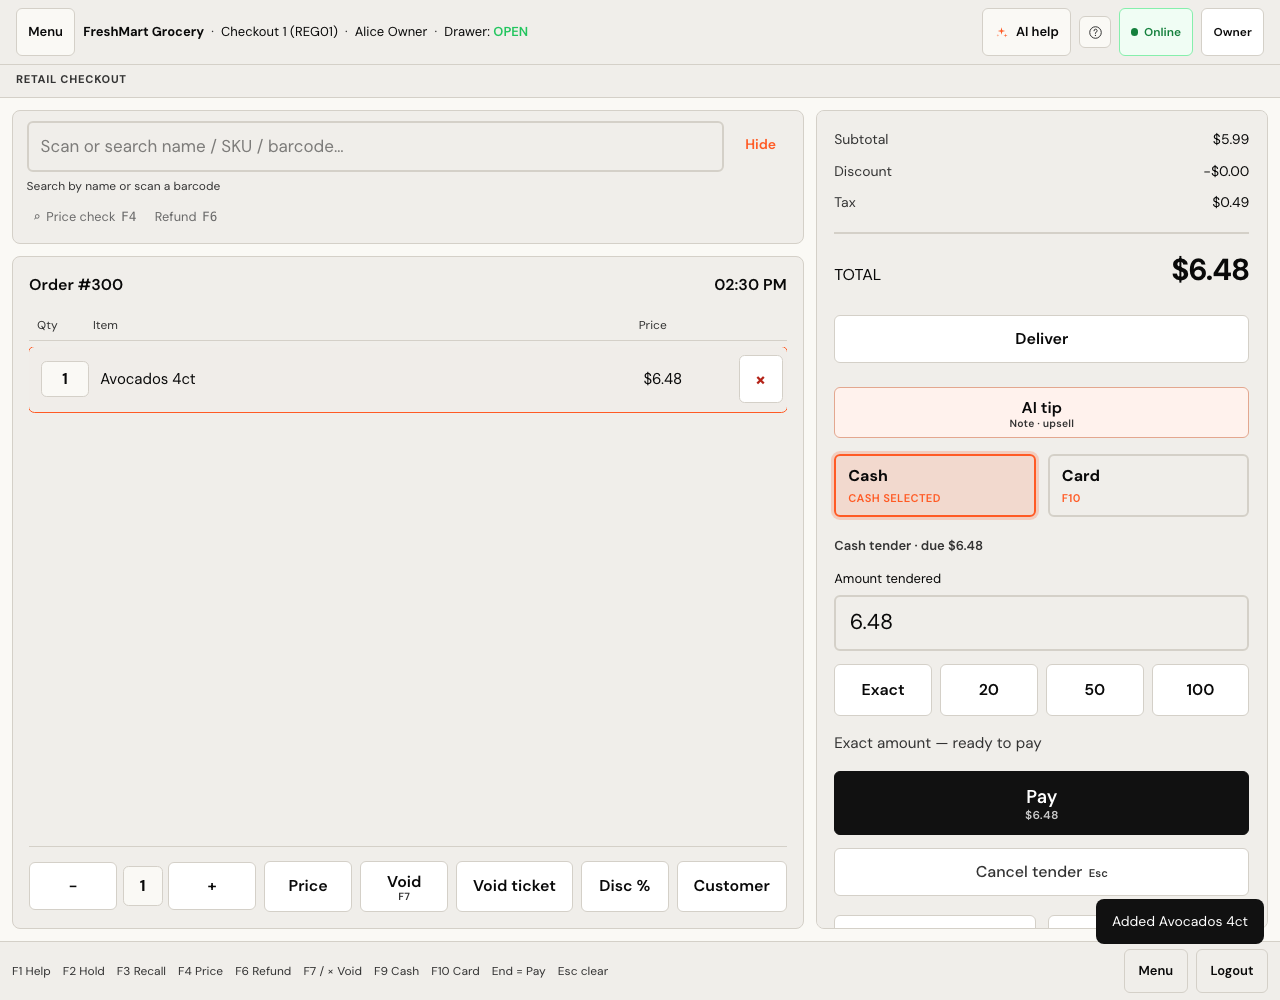
Cash
- Press F9, or tap Cash, or press End (which opens cash by default).
- Type what the customer handed over, or tap Exact, 20, 50 or 100.
- Read the line underneath: Change due, Still need …, or Exact amount — ready to pay.
- Tap Pay, or press End again.
- Take payment? appears. Press Enter to take it.
The Pay button stays dead while the tender is short, and the till says Short by … rather than letting a sale close for less than it is worth.
Pay opens a short confirmation rather than taking the money outright: Take payment?, with the Total, the tender by name and the amount going through it, and Change due when there is any. The confirm button reads Take $6.48.
Enter confirms it and Esc takes you back, so the whole flow stays Pay then Enter without reaching for the mouse. It is one keystroke, not a speed bump: taking money is the one thing on this screen a cashier cannot take back — the drawer opens, the stock moves, the receipt prints.
Card
- Press F10 or tap Card.
- Press End or tap Pay, then Enter to confirm. A card window opens — Present card, Collect on reader, Pay on Square Terminal or Take payment on bank terminal, depending on what the store has set up.
- The customer taps or inserts. When the machine approves, the sale finishes and the receipt screen appears.
A card tender is sent for exactly what is owed and cannot be over-typed. Cash change comes out of the drawer; card change does not exist. Letting a cashier charge $25 on a $23.50 sale would just be a refund waiting to happen.
Pay later
If the store allows deferred payment, a third tender appears: Pay later. It charges the sale to a customer account, so a customer must be attached first — the button shows Need cust. until one is.
Gift cards and loyalty points go on the ticket first, one after another, and whatever is left over is settled by a single cash, card or pay later tender. So $30 = $5 of points + $25 cash and $30 = $20 on a card + $10 cash are both ordinary sales — see Paying with a gift card and Paying with points.
What the till still will not do is split the remainder two ways: there is no "half cash, half bank card" on this screen. If a customer wants that, ring the goods as two sales. The restaurant lane does split a check properly — see Taking orders.
Paying with a gift card
A gift card is money the shop already took once, and it belongs to whoever is holding the card — there is no customer to look it up against, so every gift-card tender has to name a card. The Gift card button only appears where the shop has the gift cards module switched on.
- Tap Gift card. The cursor is already in the Gift card number box, so a scanner — which is just a keyboard that types the code and presses Enter — checks the card with nothing else touched. Keying the number by hand does the same thing.
- Press Check balance. The till reads back Card ••••0001 holds $45.00 before anything is committed.
- Type how much to Take off the card — the whole ticket, or less.
- Press Put on the sale. The card appears in the list on the pay pane as Gift card ••••0001 −$20.00, with an × to take it off again.
- If anything is still owed, the till has already moved you to Cash (or Card where cash is switched off) with the shortfall filled in. Pay that the usual way.
A card that cannot cover the whole basket is the ordinary case, not a failure: put on it what it holds and take the rest another way. More than one card can go on the same ticket.
A tender is refused when it is bigger than the card it is drawn on — Gift card ••••0001 has $12.50; this tender is $40.00. Tender what is on the card and take the rest another way. The ticket total has nothing to do with it.
Two tender lines on the same card are added together before the check, so $8 and $8 against a $12 card is refused rather than sneaking through as two affordable-looking halves. And if any card on the ticket is short, the whole sale is refused and no card is drained — the first one is not left emptied against a sale that never happened.
A gift card code is the money: anyone who can read it can spend it. A till screen gets photographed all day — a customer's phone, a CCTV frame, a screenshot in a support ticket — so the screen and the receipt both print ••••0001. That is enough for the cashier to confirm they scanned the card in their hand and useless to anybody who did not.
Paying with points
Loyalty points are money the customer already spent once. Unlike a gift card, points belong to a named person, so a customer has to be on the ticket before they can be spent. The Use points button only appears where the shop runs a points programme; with nobody attached it is drawn but disabled, reading Need cust., and for somebody who was never signed up it reads Not enrolled.
- Attach the customer — Customer on the ticket. The points button then shows what their balance is worth in money.
- Tap Use points. The panel says both numbers: 640 points — worth $6.40, and, where the programme has a floor, · spendable from 500 pts.
- Type how much to Take off in points — in money, not in points. The till converts at the shop's redeem rate.
- Press Put on the sale. It appears as Points (500) −$5.00, with an × to take it off.
- Pay whatever is left the usual way; the till has already filled the shortfall in for you.
Splitting is normal: a $30 basket settled with $5 of points and $25 in cash is exactly how points get used. The comparison is always the tender against the balance, never the ticket against the balance.
Points buy goods, not tax
Points pay for goods net of discount and nothing else. They do not pay the tax, and they do not pay a bottle deposit or an eco levy. Tax and statutory fees are not the shop's money — the shop collects them for somebody else and hands them over in full whatever the customer paid with, so covering them out of the rewards budget would mean the shop funding a levy out of its own pocket.
Ask for more than the goods are worth and the till says so with both numbers: Points pay for goods only, not tax or deposits. This sale has $30.00 of goods and the points tender is $32.40. Lower the points and take the rest another way.
A company whose jurisdiction treats points as a payment instrument can turn this off — Points may also pay tax and fees on the Loyalty page — and then points can settle the whole ticket. It is off by default. See Customers & loyalty.
The rate, and the floor
Both are set on the Loyalty page in the back office: Points to buy 1 {currency} (100 out of the box, so 100 points is worth 1.00) and Minimum balance before points can be spent (0 out of the box, meaning no floor). Under the floor the till refuses the whole balance — Rewards points can be spent from 1000 points. This customer has 400. Take another tender.
The programme belongs to the company, not to one shop, so the rate you set applies at every branch.
The points a tender took are recorded against the sale at the rate that was in force the day it was rung. Change the rate next month and a refund of that sale still hands back the points that were actually taken, not what they would convert to today.
An exchange runs both ways at once, so points handed back on the returned half would have to be re-spent on the new half at today's rate. The till refuses rather than guessing, and tells you what to do instead: refund the sale and ring the new one. See Refunds & returns for what a refund does to a balance.
After the sale is paid
The till switches to Sale complete: the total, the change due if there is any, the Order # the sale has just been given, the receipt number, and the receipt itself laid out as it will print.
Two keys finish the job:
| Key | Does |
|---|---|
| Enter | Print. The same as the Print button, which prints the hint Enter on itself. |
| Esc | Start the next customer. The same as New sale. |
Both buttons stay pinned to the bottom of the panel, so a long receipt never pushes them off the screen. The keys are ignored while you are typing in a box or standing on a button, so an email address with an Enter in it does not fire the printer. Full detail on Receipts.
The keys the till actually binds
These are printed along the bottom of the screen, and F1 shows the same list in a panel.
| Key | Does |
|---|---|
| F1 | Show or hide the shortcut help. |
| F2 | Hold — park the ticket as a draft. |
| F3 | Recall a parked draft. |
| F4 | Price check. |
| F6 | Refund mode (needs the right to make returns). |
| F7 | Void the selected line. |
| F9 | Cash tender. |
| F10 | Card tender. |
| End or Numpad + | Pay. From the ticket it opens the tender; in the tender it completes the payment. |
| Enter | Add the scanned barcode or the highlighted suggestion. Never Pay — except in the Take payment? confirmation, where it is the confirm, and on the receipt screen, where it prints. |
| ↑ ↓ | Move through suggestions, or through ticket lines. |
| + − | Nudge the selected line's quantity up or down. |
| Esc | Back out one step: close a panel, cancel the tender, clear what you typed, put the cursor back in the search box. |
When the connection drops
The pill in the top bar switches to Offline. You can still take a cash sale: the till queues the payment and sends it when the connection comes back. The receipt screen appears as normal. Card payments need the network, because the card machine does.
A sale with a gift card or points on it is refused while the connection is down — No connection — a gift card cannot be taken offline, because the balance can only be checked at the server. Take another tender.
The reason is that a balance can only be checked and locked by the database. A queued redemption would be posted whenever the connection came back, against a balance nobody could verify at the counter: the same card, or the same points, could be spent on two lanes and both sales would look fine to both cashiers. Take cash instead and the sale queues as normal.
Buttons appear based on what your role is allowed to do and what the store has switched on. No Price? Your role has no price override. No Refund? No returns right. No Card or no Cash? The store has turned that tender off in settings — though it will never hide both. No Gift card or no Use points? This store does not have that module switched on. An option that can only ever end in a refusal is worse than no option with a customer waiting, so the button is not drawn at all.